
If you’ve ever poured wine only to find it cloudy or hazy, you know how disappointing it can be. While time can naturally clear most wines, bentonite offers a faster, more reliable solution. What makes this clay-based fining agent special is its ability to work during fermentation itself, saving you time and improving your final product.
This guide walks you through everything you need to know about using bentonite in primary fermentation, from understanding what it does to mastering the techniques that professional winemakers use.
What Is Bentonite and How Does It Work?
Bentonite is a natural clay formed from weathered volcanic ash. The material has been used in winemaking for decades because of its unique electrical properties. Wine contains positively charged proteins that cause cloudiness and haze. Bentonite carries a negative charge, which attracts these proteins like a magnet.
When you add bentonite to wine, it binds to the suspended particles. The combined weight of the clay and proteins becomes too heavy to stay floating, so they sink to the bottom of your fermenter. This process, called adsorption, leaves your wine clear and stable without altering its taste or color when used correctly.
odium bentonite and calcium bentonite. Sodium bentonite leaves salt behind in your wine, while calcium bentonite leaves calcium. Most winemakers prefer calcium bentonite because it’s less likely to cause tartrate instabilities, though both work well for clearing wine. However, when it comes to which type of bentonite is best for pond sealing – sodium or calcium, sodium bentonite is preferred for its superior swelling and sealing ability.
Why Add Bentonite During Primary Fermentation?
The timing of bentonite addition matters more than many home winemakers realize. Adding bentonite in primary fermentation offers several advantages over post-fermentation treatments.
During active fermentation, yeast converts sugar into alcohol and carbon dioxide. Those CO2 bubbles don’t just create the fizz you see. They also create a natural circulation system in your fermenter. When bentonite settles on the bottom, CO2 bubbles form around the particles and carry them up through the wine. When the bubble reaches the surface and pops, the bentonite falls back down, collecting more proteins along the way.
This constant movement means the bentonite stays active throughout fermentation, clearing your wine continuously rather than in a single treatment. You’ll need less bentonite this way compared to post-fermentation additions. Where you might use 1-2 tablespoons per gallon after fermentation, you only need about 1 teaspoon per 5 gallons when adding it early.
Research published in Food Chemistry found that mid-to-late fermentation additions work particularly well. The study showed that ethanol may open up the bentonite structure, creating more surface area and binding sites for proteins. This makes the fining process more efficient as fermentation progresses.
Commercial wineries, especially those making white wines and rosés, have adopted this practice for good reason. High-protein grape varieties like Sauvignon Blanc and Gewürztraminer benefit most from early protein stabilization. The practice preserves aromatic compounds better than post-fermentation treatments, though scientists still don’t fully understand why. One theory suggests that bentonite inhibits aroma-degrading enzymes during fermentation.
When to Use Bentonite in Primary Fermentation
Not every wine needs bentonite added during primary fermentation. White wines almost always benefit from this treatment because they contain higher protein levels that cause haze. Rosé wines also respond well to early bentonite additions.
Red wines present a different situation. While you can technically use bentonite in primary fermentation for red wine, most winemakers avoid it. Bentonite absorbs anthocyanins, the pigment compounds that give red wine its color. Adding bentonite to red wine during fermentation can strip away color and body, leaving you with a lighter, less appealing product.
If you’re working with wine kits, you’ll notice many include bentonite with instructions to add it on day one. Kit manufacturers design this approach to speed up the clearing process so you can bottle within 4-8 weeks. The simplified instructions also make it easier for beginners to get good results.
For wines made from fresh grapes or juice, consider your goals. If you want to bottle quickly or you’re working with high-protein varieties, add bentonite early. If you prefer traditional winemaking methods and don’t mind waiting for natural clarification, you can skip the early addition or use it post-fermentation instead.
Preparing Your Bentonite Slurry
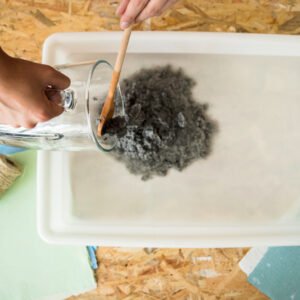
Proper preparation makes all the difference when working with bentonite. The clay doesn’t dissolve in water; it forms a suspension. Getting the consistency right ensures it disperses evenly through your wine rather than clumping at the bottom.
Start with hot water between 140-200°F. Some winemakers use boiling water, while others prefer around 160°F. The heat helps the bentonite absorb water and creates a smoother slurry.
For a standard 5-gallon batch during primary fermentation, you’ll need about 1 teaspoon (roughly 4-5 grams) of bentonite and 1/2 to 3/4 cup of hot water. If you’re adding bentonite post-fermentation, you’ll need significantly more: typically 3-9 grams per gallon.
Here’s the technique that works best:
Pour your hot water into a clean bowl or container. Sprinkle the bentonite slowly over the water surface while stirring continuously. Don’t dump it all at once or you’ll create lumps that are difficult to break apart. If you do get clumps, use the back of your spoon to crush them against the side of the bowl.
The mixture will look grainy at first. Let it rest for 5-10 minutes, then stir again. Repeat this process 3-4 times over the course of 30-60 minutes. Each time you stir, the slurry will become smoother as the bentonite absorbs more water. When finished, you should have a thin, pourable slurry without large clumps.
Some winemakers use a blender to create their slurry. If you go this route, blend the bentonite and hot water for 1-2 minutes, then let it rest for an hour before adding it to your wine.
Discover how bentonite slurry enhances stability and waterproofing in diaphragm wall construction — read this blog to learn more!
Step-by-Step: Adding Bentonite to Your Fermenter
The process of adding bentonite during primary fermentation is straightforward, but a few details matter for best results.
Clean and sanitize all your equipment first. This includes your fermenter, stirring spoon, and any measuring tools. While you’re not adding the bentonite to finished wine, maintaining good sanitation habits prevents contamination issues down the line.
If you’re starting a new batch from a wine kit, add your prepared bentonite slurry to the empty primary fermenter first. Pour in about 2 liters of hot water, add the bentonite, and stir well. Then add your grape juice or concentrate and continue with the rest of your recipe.
For wines made from fresh grapes or juice, you have options. Some winemakers add bentonite immediately after crushing and pressing, before adding yeast. Others wait until fermentation is actively underway. CMS Industries, a leading bentonite manufacturer in India, recommends following specific dosage guidelines based on your wine style and protein content.
The timing within fermentation can affect results. Adding bentonite in the middle to late stages of primary fermentation often works best for protein removal. This allows the alcohol content to rise, which may improve the bentonite’s effectiveness.
Pour your prepared slurry directly into the fermenter and stir gently but thoroughly. You want to distribute it evenly without aerating the wine excessively. The bentonite will initially settle to the bottom, but once fermentation starts producing CO2, the circulation begins.
Don’t worry if you see a layer of bentonite sediment at the bottom of your fermenter within the first few hours. This is normal. As fermentation ramps up, the CO2 production will keep it moving through the wine.
Dosage Guidelines and Adjustments
Getting the bentonite dosage right prevents problems like stripped color or excessive sediment while ensuring proper clarification.
For primary fermentation additions, use these starting points:
- White wines: 1 teaspoon (4-5 grams) per 5 gallons
- Rosé wines: 1 teaspoon (4-5 grams) per 5 gallons
- Red wines: Avoid or use minimal amounts (1/4 to 1/2 teaspoon per 5 gallons) only if absolutely necessary
Post-fermentation dosages are much higher because the bentonite doesn’t get the benefit of CO2 circulation. You’ll typically need 1-2 grams per gallon, or about 5-10 grams for a 5-gallon batch.
These are guidelines, not rules. Wine composition varies based on grape variety, growing conditions, and winemaking techniques. Professional winemakers conduct bench trials to determine the exact amount needed for each batch.
To run a bench trial, create a 5% bentonite solution by mixing 50 grams of bentonite with 850ml of hot water, then topping up to 1 liter total volume. Take several small samples of your wine in clear jars and add different amounts of the solution to achieve addition rates between 0.3g/L and 2.0g/L. Let the samples sit overnight and observe which achieves the clarity you want with the minimum amount of bentonite.
If you use too much bentonite, you’ll notice several issues. The sediment bed becomes deeper and looser, taking up more space in your fermenter. White wines may lose some aromatics and body. Red wines can lose color and develop a washed-out appearance. The wine might taste thin or stripped of character.
If you use too little, the wine may not achieve proper protein stability. You might think it looks clear, but it could develop haze later in the bottle, especially if exposed to temperature changes.
What Happens During and After Fermentation
Understanding the timeline helps you know what to expect when using bentonite in primary fermentation.
Within the first few hours after adding bentonite, you’ll see most of it settle to the bottom of your fermenter. This is normal. Once your yeast becomes active and CO2 production begins, you’ll notice the bentonite layer gets disturbed and starts circulating.
Throughout active fermentation, the bentonite makes repeated trips up and down through the wine. Each cycle allows it to collect more proteins and particulates. This process continues for several days until fermentation slows down.
As fermentation winds down and CO2 production decreases, the bentonite gradually settles back to the bottom. By the time fermentation completes, you should see a distinct layer of sediment at the bottom of your fermenter. This sediment consists of bentonite, dead yeast cells, and the proteins that the bentonite removed from the wine.
When you rack your wine off to secondary fermentation or aging, leave this sediment behind. Use a racking cane or siphon positioned well above the sediment layer. You don’t want to transfer the bentonite to your next vessel.
The amount of sediment you see depends on several factors: how much bentonite you added, how much protein was in your must, and how much yeast mass accumulated. Don’t be alarmed if the sediment layer looks substantial. This is a sign the bentonite did its job.
After racking, your wine should already show improved clarity compared to wine that didn’t receive bentonite during fermentation. You may still want to add fining agents later for final polishing, but you’ll need less of them and the clearing time will be shorter.
Common Mistakes and How to Avoid Them
Even experienced winemakers sometimes run into issues with bentonite. Here’s how to avoid the most common problems.
Using unpure bentonite during fermentation can cause serious issues. Standard grade bentonite may contain copper and iron impurities. During the heat and vigor of fermentation, these metals can leach out, creating green or brown color taints in your wine. If you plan to add bentonite during fermentation, invest in a high-purity product specifically designed for this purpose. CMS Industries produces multiple grades of bentonite suitable for different winemaking applications.
Don’t add bentonite at the same time as pectic enzymes. The bentonite will absorb the enzymes, making both less effective. If your recipe calls for pectic enzyme, add it first and wait at least 24 hours before adding bentonite.
Avoid over-stirring or aerating your wine when adding bentonite. While you need to distribute it evenly, excessive stirring introduces oxygen, which can lead to oxidation and off-flavors. Stir gently but thoroughly.
Some winemakers make their slurry too thick. If the bentonite mixture is paste-like rather than pourable, it won’t distribute properly through your wine. It will clump at the bottom instead of circulating with the CO2 bubbles. Always aim for a thin, milky consistency.
Temperature matters more than you might think. Bentonite works better at warmer temperatures and lower pH levels. Cold fermentation temperatures can reduce its effectiveness. If you’re fermenting at cool temperatures (below 60°F), you may need to add slightly more bentonite or extend the contact time.
Don’t reuse yeast sediment that contains bentonite. Some beer brewers reuse yeast slurry from one batch to start another, but this practice isn’t recommended with wine yeast, especially if bentonite is present. The higher alcohol content stresses the yeast, and the bentonite doesn’t separate easily from the yeast cells.
Bentonite vs. Other Fining Agents
Understanding when to use bentonite instead of other clarifying agents helps you make better winemaking decisions.
Bentonite stands out because it’s one of the only fining agents safe to use during active fermentation. Most other clarifiers need to be added after fermentation completes.
Sparkolloid, another popular fining agent, carries a positive charge, which makes it work differently than bentonite. Some winemakers use both: bentonite during primary fermentation followed by Sparkolloid post-fermentation. The opposite charges allow them to bind to different types of particles, giving you extremely clear wine.
Isinglass, made from fish bladder, and Kitosol 40 are considered “polishing” agents. They remove the last little bit of haze that bentonite might miss. These work well as follow-up treatments if your wine isn’t quite as clear as you want after bentonite treatment.
For red wines, gelatin is often a better choice than bentonite. It removes harsh tannins and bitterness without stripping color the way bentonite can.
Each fining agent has side effects. They all remove something from the wine, not just the haze particles. The key is using the minimum amount necessary to achieve the clarity and stability you need.
Many winemakers wonder if they can skip fining agents entirely. The answer is yes. Given enough time and proper cellar conditions, most wines will clear naturally. The sediment gradually settles out over months or years. Bentonite and other fining agents simply speed up this natural process and provide more predictable results.
Monitoring Results and Adjusting for Future Batches
Learning to evaluate your results helps you improve your technique for next time.
Check your wine’s clarity at several stages. First, look at it immediately after racking off the bentonite sediment. Hold a glass up to a light source. Can you read text through the wine? Does it have a bright, clear appearance or is there still visible haze?
Next, check again after a few weeks in secondary fermentation or aging. Sometimes wine that looks clear initially will develop haze as proteins precipitate slowly over time. If this happens, you may need to use more bentonite in future batches of similar wine.
Professional winemakers test for protein stability using heat tests. Heat a sample of your wine to around 80°C (176°F) and let it cool. If cloudiness develops, the wine still contains unstable proteins that could cause haze in the bottle. This indicates you need additional fining.
Keep notes on every batch you make. Record how much bentonite you used, when you added it, the fermentation temperature, and the results. Over time, you’ll develop a sense for how much bentonite your particular style of winemaking requires.
Don’t chase perfect clarity at the expense of wine quality. A bit of haze isn’t necessarily bad, especially in natural or minimal intervention wines. Some of the most characterful wines have a slight cloudiness. Balance your desire for clear wine against the risk of stripping too much body, aroma, and flavor.
If you consistently find that bentonite removes too much character from your wines, try reducing the dosage by 25-50%. You can always add more fining agents later, but you can’t put back what you’ve stripped out.
Using bentonite in primary fermentation is one of those techniques that seems complicated at first but becomes second nature with practice. Whether you’re making a crisp Sauvignon Blanc or a delicate rosé, this natural clay helps you achieve professional-quality clarity while preserving the aromatic compounds that make your wine special. Start with conservative dosages, keep detailed notes, and adjust based on your results. Your future batches will benefit from the experience.
Frequently Asked Questions
Can I add bentonite during fermentation if I’m making mead or cider?
Yes, you can use bentonite in primary fermentation for mead and cider just like wine. The same principles apply: CO2 production circulates the bentonite, allowing you to use less product and achieve faster clearing. For mead, use about 1/2 to 1 teaspoon per gallon. Cider typically needs less, around 1/2 teaspoon per gallon. Keep in mind that mead naturally clarifies well with time, so some meadmakers skip bentonite entirely.
Will bentonite affect my wine’s fermentation or yeast health?
Bentonite actually helps yeast performance rather than hindering it. It provides nucleation sites where CO2 bubbles can form, which helps degas the wine naturally. The clay particles also help yeast cells settle out cleanly, making racking easier. Research shows that bentonite doesn’t reduce yeast assimilable nitrogen (YAN) levels, so your yeast still has the nutrients it needs. Just make sure to follow proper yeast nutrition practices regardless of bentonite use.
How long should I wait after adding bentonite before racking?
If you add bentonite during primary fermentation, wait until fermentation completely finishes before racking. This typically takes 7-14 days depending on your must and fermentation temperature. You’ll know fermentation is done when there’s no more visible CO2 production and your hydrometer readings stabilize for three consecutive days. For post-fermentation additions, wait 10-14 days after adding bentonite before racking off the sediment.
What should I do if my wine is still cloudy after using bentonite?
First, give it more time. Some proteins precipitate slowly and the wine may clear on its own over a few more weeks. If it remains stubbornly cloudy, consider a second fining treatment with a different agent. Sparkolloid works well as a follow-up because its positive charge complements bentonite’s negative charge. You might also have a pectin haze, which requires pectic enzyme rather than additional fining agents. If you suspect chill haze, try cold stabilization by chilling the wine to near freezing for a week.
Does bentonite have any effect on wine’s long-term aging potential?
Bentonite-treated wines are actually more stable in storage than untreated wines. By removing unstable proteins early, you reduce the risk of haze developing in the bottle over time. The bentonite itself doesn’t remain in the wine since it settles out completely when you rack. Most commercial wines intended for aging receive bentonite treatment. However, use the minimum effective dose, as excessive fining can strip some of the phenolic compounds that contribute to aging complexity in red wines.